First Agent Setup
This guide walks through creating and running an agent. In AgentMux an agent is not a terminal wrapper: each one gets its own structured pane, with an identity, optional memory, a streaming parser and a lifecycle.
Harnesses and providers
Section titled “Harnesses and providers”A harness is the CLI tool that runs an agent, such as Claude Code or Codex CLI. The UI and the code mostly call it a “provider”. A harness is distinct from the model vendor, the LLM backend that actually serves its responses.
AgentMux knows nineteen providers: Claude Code, Codex CLI, Mux Code, Gemini CLI, Qwen Code, Kimi Code CLI, OpenClaw, Pi, GitHub Copilot CLI, Antigravity (AGY), Kilo Code CLI, Cline CLI, OpenCode, goose, Grok Build, DeepSeek Harness, Aider, Crush and Muse Code. They’re defined in frontend/app/view/agent/providers/catalog.ts (PROVIDERS) and crates/srv/src/backend/providers.rs. The agent picker has a template for seventeen of them. Mux Code and Qwen Code don’t have one yet.
Most harnesses run in the agent pane: AgentMux reads the CLI’s structured output and shows the conversation, tool calls and edits itself. Aider, Crush and Muse Code have no interface AgentMux can read that way yet. They run in the terminal tier: the card opens a terminal pane running the CLI’s own UI in the agent’s folder. AgentMux still writes the agent’s startup file and points the CLI at its config folder, but it shows no transcript, token count or resume for them. The CLI’s own UI does that.
| Provider | How AgentMux runs it | Installed from | Sign-in |
|---|---|---|---|
| Claude Code | claude --input-format stream-json --output-format stream-json …, one long-running process. Container agents run claude -p … once per turn instead. | npm @anthropic-ai/claude-code | OAuth |
| Codex CLI | codex exec --json --dangerously-bypass-approvals-and-sandbox -, once per turn | npm @openai/codex | OAuth |
| Mux Code | muxcode run -p, once per turn | npm @agentmuxai/muxcode | API key or local model |
| Gemini CLI | gemini --output-format stream-json --yolo -p "", once per turn | npm @google/gemini-cli | OAuth |
| Qwen Code | qwen --output-format stream-json --include-partial-messages --yolo -p "", once per turn | npm @qwen-code/qwen-code | API key |
| Kimi Code CLI | kimi --print --output-format stream-json --yolo, once per turn, with the prompt on stdin | You install it: pip install kimi-cli | API key |
| OpenClaw | openclaw acp, the Agent Client Protocol (ACP) over stdio. It needs OpenClaw’s own Gateway daemon running. | npm openclaw | OAuth |
| GitHub Copilot CLI | copilot --acp (ACP) | npm @github/copilot | OAuth |
| Pi | pi-acp (ACP), an adapter that runs the pi CLI installed beside it | npm pi-acp and @earendil-works/pi-coding-agent | The CLI’s own sign-in |
| Antigravity (AGY) | agy --output-format stream-json --dangerously-skip-permissions -p <prompt>, once per turn | You install it: Google’s installer | The CLI’s own sign-in (Google, once per machine) |
| Kilo Code CLI | kilo acp (ACP) | npm @kilocode/cli | The CLI’s own sign-in (kilo auth login). It runs signed out on Kilo’s free models. |
| Cline CLI | cline --acp (ACP) | npm cline | The CLI’s own sign-in (cline auth) |
| OpenCode | opencode acp (ACP) | npm opencode-ai | The CLI’s own sign-in (opencode auth login). It runs signed out on OpenCode’s free models. |
| goose | goose acp (ACP) | You install it: goose’s installer (a GitHub release) | A model provider and key, set once with goose configure |
| Grok Build | grok agent stdio (ACP) | You install it: xAI’s installer | The CLI’s own sign-in (grok login), or XAI_API_KEY |
| DeepSeek Harness (preview) | dsh --profile acp (ACP) | npm @deepseek-ai/dsh (a prerelease) | A DeepSeek API key, set in its web UI (dsh web) or as DEEPSEEK_API_KEY |
| Aider | aider --read AGENTS.md --analytics-disable … in a terminal pane | You install it: Aider’s installer (Python, through uv) | Your model provider’s key in the environment, such as OPENAI_API_KEY or ANTHROPIC_API_KEY |
| Crush | crush in a terminal pane | npm @charmland/crush | The CLI’s own sign-in (crush login), or a key set in its UI |
| Muse Code | muse --trust-workspace in a terminal pane | You install it: Meta’s installer | The CLI’s own sign-in (muse login, a Meta account), or META_API_KEY |
DeepSeek Harness is marked preview: upstream ships only prereleases and says to expect breaking changes. Its ACP mode can’t replay an earlier session, so resuming one reopens it without its history.
For the nine newest harnesses, AgentMux turns off telemetry, self-update and other data defaults where the CLI lets it. See Data sovereignty for the list.
See Auth flows for each provider’s login command and credential location.
You don’t need to preinstall the agent CLIs
Section titled “You don’t need to preinstall the agent CLIs”AgentMux manages its own agent CLIs. It installs every npm-based CLI itself: it runs npm install <package>@<version> (never a global install), at the version it was tested with, into ~/.agentmux/shared/cli/<provider>/<version>/. Every AgentMux version and channel on the machine shares that folder, so a CLI is installed again only when an AgentMux update changes its pinned version. AgentMux always uses that copy, never a CLI you installed globally, and it keeps each agent’s login and settings in its own folders rather than in your ~/.claude, ~/.codex and similar.
This isolates the tools, not what an agent can do: a host agent still runs on your computer, with your files, your HOME and your PATH.
When a harness’s CLI isn’t installed, its card shows Click to install, and the panel that opens under the card starts with the install. It shows plain steps (Check requirements, Download packages, Set up files, Run setup scripts, Check <harness> is installed); the raw npm output sits under Details, which opens by itself if the install fails. Click Install now; the agent’s fields follow when it finishes. If it fails, click Retry. The install needs an internet connection. Closing the panel doesn’t stop it: the card shows Installing…, and a notification says when it has finished. Cancel install stops it.
Six harnesses aren’t on npm, so you install them yourself with the vendor’s own installer. These are the vendors’ full installers, not isolated by AgentMux: each installs into your user account and puts the CLI on your PATH, and a login you make with it is the CLI’s own. ≡ → Toolchain marks such a copy your install. AgentMux then finds the CLI on your PATH. For all of them but Kimi Code CLI it also looks in the folder the installer uses, so you don’t need to restart AgentMux after installing. If it can’t find the CLI, its card shows Click to install, and the panel under it shows the install command for your system, with Copy, a link to the vendor’s instructions, and Check again:
| Harness | Windows (PowerShell) | macOS and Linux |
|---|---|---|
| Kimi Code CLI | pip install kimi-cli | pip install kimi-cli |
| Antigravity (AGY) | irm https://antigravity.google/cli/install.ps1 | iex | curl -fsSL https://antigravity.google/cli/install.sh | bash |
| goose | irm https://github.com/aaif-goose/goose/releases/download/stable/download_cli.ps1 | iex | curl -fsSL https://github.com/aaif-goose/goose/releases/download/stable/download_cli.sh | CONFIGURE=false bash |
| Grok Build | irm https://x.ai/cli/install.ps1 | iex | curl -fsSL https://x.ai/cli/install.sh | bash |
| Aider | irm https://aider.chat/install.ps1 | iex | curl -LsSf https://aider.chat/install.sh | sh |
| Muse Code | irm https://dev.meta.ai/install.ps1 | iex | curl -fsSL https://dev.meta.ai/install.sh | sh |
AgentMux runs whatever version of these you have installed. It turns off their self-update where the CLI allows it (Grok Build and Muse Code), so a working version doesn’t change under a running agent. For Muse Code on Windows, AgentMux runs the native binary the installer downloaded, not its launcher script.
System prerequisites
Section titled “System prerequisites”The npm-based CLIs need Node.js and npm. Some need a recent Node.js: Gemini CLI 20 or later, Claude Code and Qwen Code 22, Pi and DeepSeek Harness 22.19, OpenClaw 24.16, and Mux Code 24.18.1. Claude Code and OpenClaw also need Git. The harnesses you install yourself bring what they need, except Kimi Code CLI, which needs Python. If one of these is missing when you pick a harness, AgentMux lists it with an install link, and for Git, Node.js, npm and Python a one-click install. The one-click install uses winget on Windows or Homebrew on macOS (if you have them), or your distribution’s package manager on Linux. They show as the first step of the panel under the card; click Check again once the tool is installed. A tool installed with one click may show “installed, restart AgentMux to use it” until you restart AgentMux. If the tool is installed somewhere AgentMux can’t see on PATH, Continue anyway moves on. ≡ → Toolchain shows the same information for all tools at any time.
Create an agent
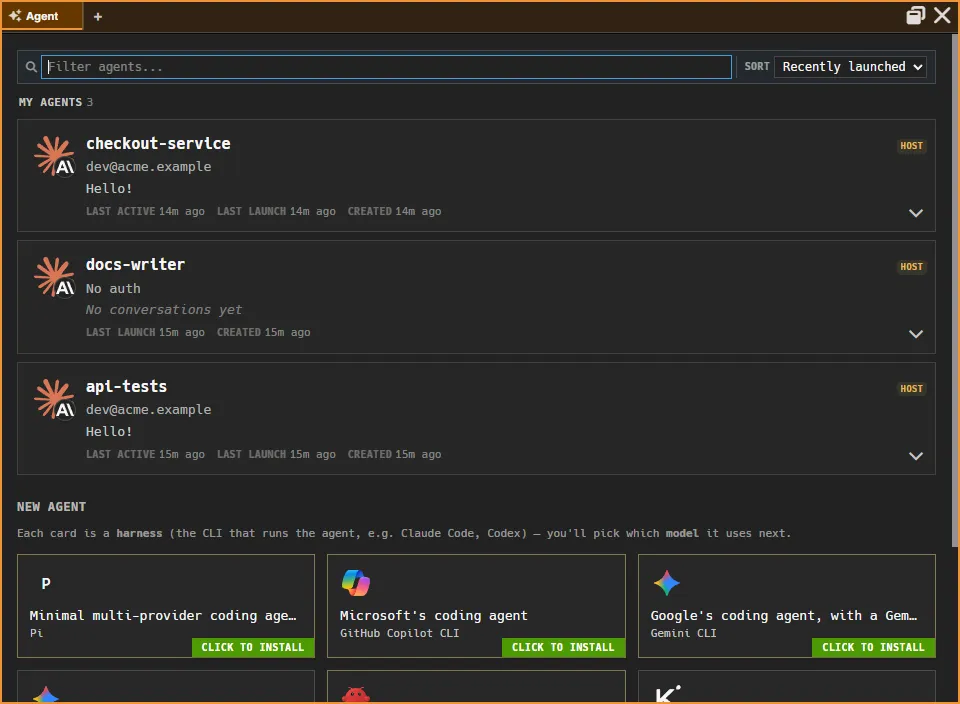
Section titled “Create an agent”Open an Agent pane. The starter layout already has one; you can also click Agent in the widget bar, or run Open Agent from the command palette (Ctrl + P). An empty Agent pane shows the agent picker:
- A filter bar and sort control.
- My Agents: agents you’ve already created. Click one to relaunch it and continue its current conversation. If it’s already open in another pane, choose Open new session (forks the conversation into a new agent) or Switch to existing. Each row’s menu has Rename, Duplicate, View History and Delete.
- New Agent: one card per harness. Each card is a template.
Clicking a card opens a panel under it, pushing the cards below it down; click the card again, or press Esc, to close it. The panel shows only the steps that apply: the prerequisites and the install above, then the new agent’s fields. It makes a new, independent agent and leaves the template unchanged, and what you type is kept if you open another card and come back. Fields, top to bottom:
- Name: required, and empty to start with. Name it for its job, like Reviewer or Docs writer. Names must be unique among your agents (ignoring case).
- Runtime: On this computer (host) or In a safe sandbox (container). See Host and container agents.
- Model: shown only for Claude Code and Codex CLI, the harnesses AgentMux passes a
--modelflag to. You can change it later from the pane’s runtime picker. - Model Vendor / Custom Endpoint: shown only for Claude Code. It redirects the harness to another API endpoint through
ANTHROPIC_BASE_URL. Leave it blank to use the default. - Bundles: the bundles the agent starts with, in order. It starts empty. Add a bundle… adds one; each has Move up, Move down and Remove. The order matters: when two bundles name the same skill, the first wins.
There’s no account field. The agent takes the provider’s first account from Connectors → Accounts, and you can change it later from the agent’s Stash → Accounts. If you have none, a provider that needs an account (see Sign in) asks you to sign in when the agent starts.
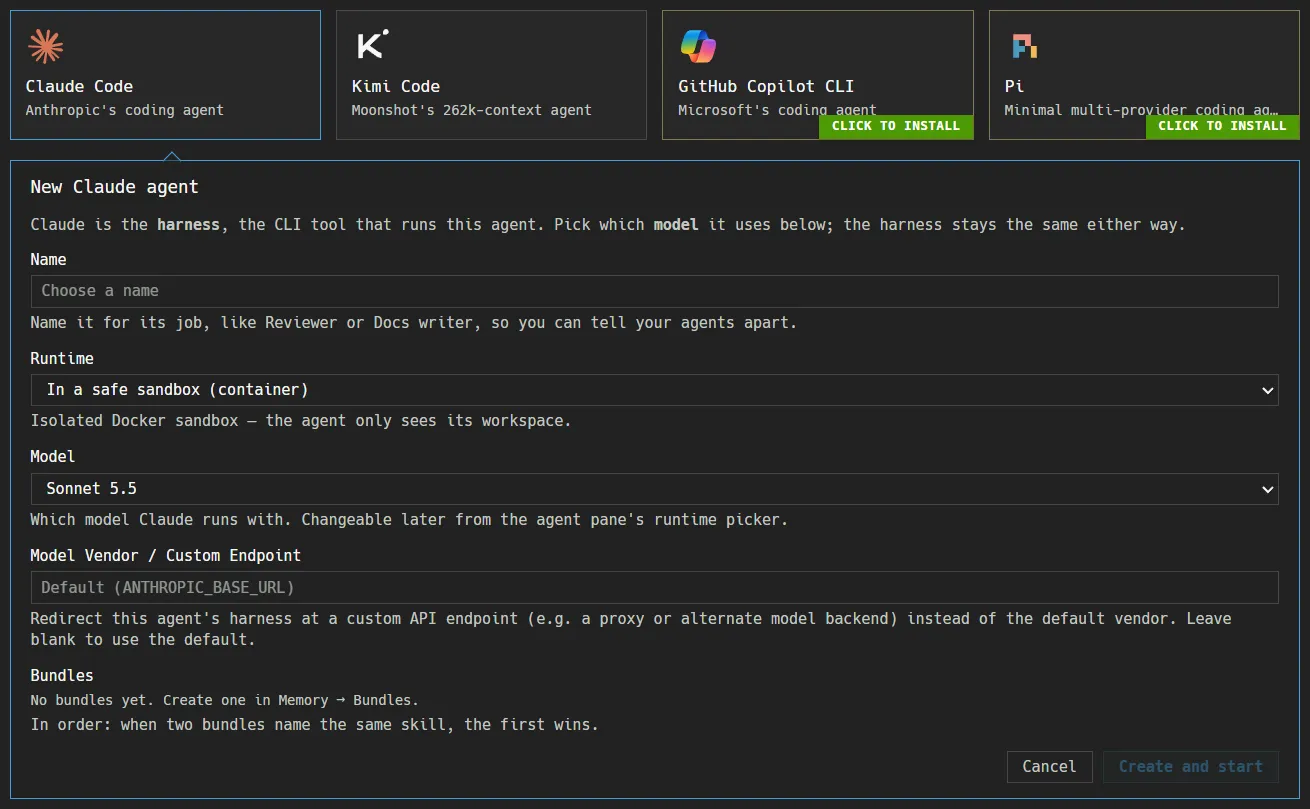
Click Create and start (or press Enter). The agent is created and launched in the pane.
The model lists are built into AgentMux. For Claude Code only, AgentMux also asks Anthropic’s models API for the current models at startup and updates the list. It needs a token for that: a Claude Code login in the shared folder ~/.agentmux/shared/providers/claude/, or the CLAUDE_CODE_OAUTH_TOKEN environment variable. A login saved as an account in Connectors → Accounts isn’t used for this. Without a token, the built-in list stays.
Sign in
Section titled “Sign in”Claude Code, Codex CLI, Gemini CLI, GitHub Copilot CLI and OpenClaw need an account bound to the agent (see Connectors → Accounts). AgentMux refuses to start them without one; it doesn’t fall back to a login in a shared folder. The other providers use AgentMux’s shared login for that provider.
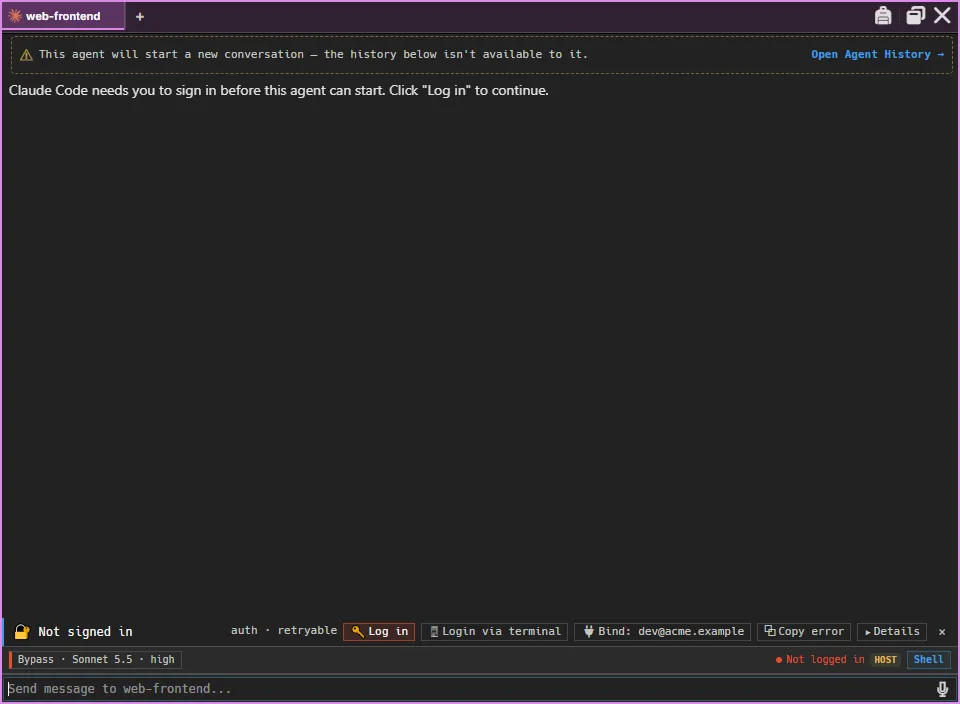
When an agent pane launches, AgentMux runs the CLI’s own auth check. If the CLI isn’t signed in, the pane shows Not signed in. If the provider needs an account and none is bound, it shows No account linked. Both rows have these actions:
- Log in: runs the provider’s own login command. AgentMux opens the login link in your browser and shows it in the pane, with a box to paste an authorization code into if the CLI asks for one. If the CLI prints no link, a terminal window opens for the login instead.
- Login via terminal: runs the login in a terminal window straight away.
- Connectors → Accounts: opens the Connectors pane on its Accounts section. If you already have signed-in accounts for this provider, this action is replaced by Bind: <account> (one account) or Bind account (several), which links an existing account to this agent.
For the five providers above, a successful login is saved as an account in Connectors → Accounts and bound to the agent. For the other providers, the login lands in AgentMux’s shared folder for that provider. Aider is the exception: it has no login and no config-folder variable, so it reads model keys from the environment and keeps its own state in ~/.aider. Auth flows explains where credentials are kept.
The nine newest harnesses have no status command AgentMux can rely on, so it can’t tell before launch whether they’re signed in. If one isn’t, the CLI says so in the pane (for example “Authentication required”). Their logins are interactive, so AgentMux runs them in a terminal window.
Bundles
Section titled “Bundles”A bundle is a reusable set of instructions and tools that you give to agents. Bundles are optional: an agent with none runs the harness as it comes. Create bundles in Memory: Memory → Bundles → + New Bundle.
| Field | Description |
|---|---|
| Name | Required. |
| Description | Optional. |
| Suggested for | Optional: the provider the bundle was made with in mind. A hint only. |
| Suggested vendor | Optional, and shown only when that provider supports more than one vendor. |
| Instructions | Text AgentMux delivers through the provider’s startup instructions file, such as CLAUDE.md, AGENTS.md or GEMINI.md. All nine newest harnesses use AGENTS.md. Aider doesn’t read it by itself, so AgentMux passes it with --read AGENTS.md. Grok Build and Muse Code read project rules only in a trusted folder, so AgentMux trusts the agent’s own folder for them. Kimi Code CLI reads no such file, so instructions don’t reach it. |
| Per-provider instruction overrides | Alternative instructions for particular providers. |
Click Save. After saving, a bundle’s detail view also links MCP servers and skills from the catalogs in Connectors and Memory, or adds servers private to the bundle. AgentMux writes an agent’s MCP servers, plus its own agentmux server, to .mcp.json in the agent’s working directory, the file Claude Code reads. If you launch an agent in your own project and it already has a .mcp.json, AgentMux merges its servers into that file instead of replacing it. Your own entries and other top-level keys are kept, and on a name clash AgentMux’s entry wins. On each launch AgentMux replaces only the entries it wrote itself, so a server you unbind disappears from the file. A .mcp.json that isn’t valid JSON is left untouched. Harnesses that run over ACP get the same servers from AgentMux when their session starts, so they don’t need to read the file. The terminal-tier harnesses (Aider, Crush, Muse Code) don’t get them from AgentMux. The file holds the agent’s message-signing key, so on Linux and macOS it’s written readable only by your user account (mode 0600). Consider adding it to your project’s .gitignore (crates/srv/src/backend/agent_config.rs, write_mcp_json_respecting_user_servers).
A bundle works with any agent: the agent’s own provider decides which harness it launches with, and an agent’s provider is fixed once it’s created (fork the agent to run it on another). A bundle’s instructions go into the agent’s startup file after Global Memory; its MCP servers are added when the agent is opened through MuxAPI, but the Launch button doesn’t add them yet. See Bundles for the full configuration surface.
The agent pane
Section titled “The agent pane”The agent pane shows:
- Streaming output, as the agent generates it.
- Tool calls, each with a status icon and a one-line summary of its arguments.
- File edits as unified diffs.
- Working status: a row above the message box while a turn runs, with a timer and what the agent is doing (“Working…”, or the current step, such as a subagent’s task).
- A Disconnected from stream banner with a Reconnect button, if the pane loses its stream while a turn is running.
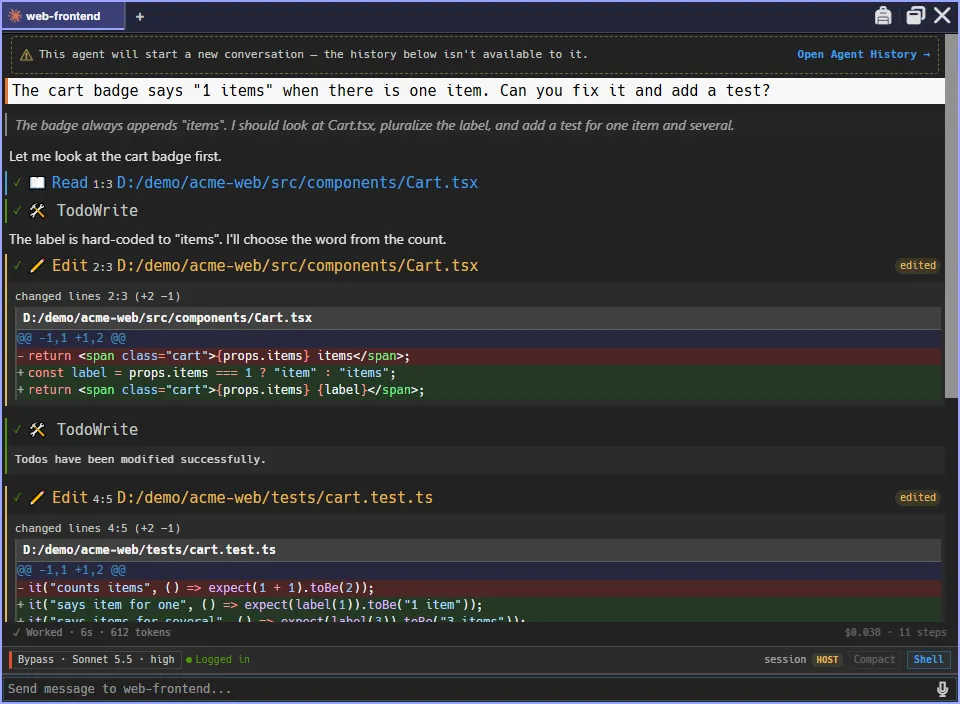
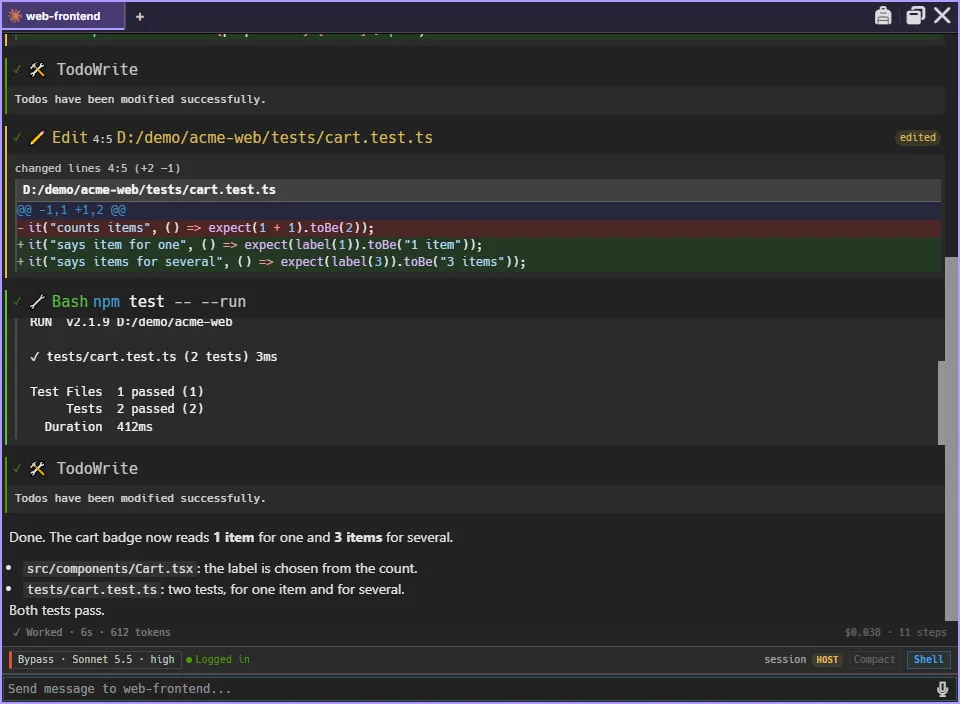
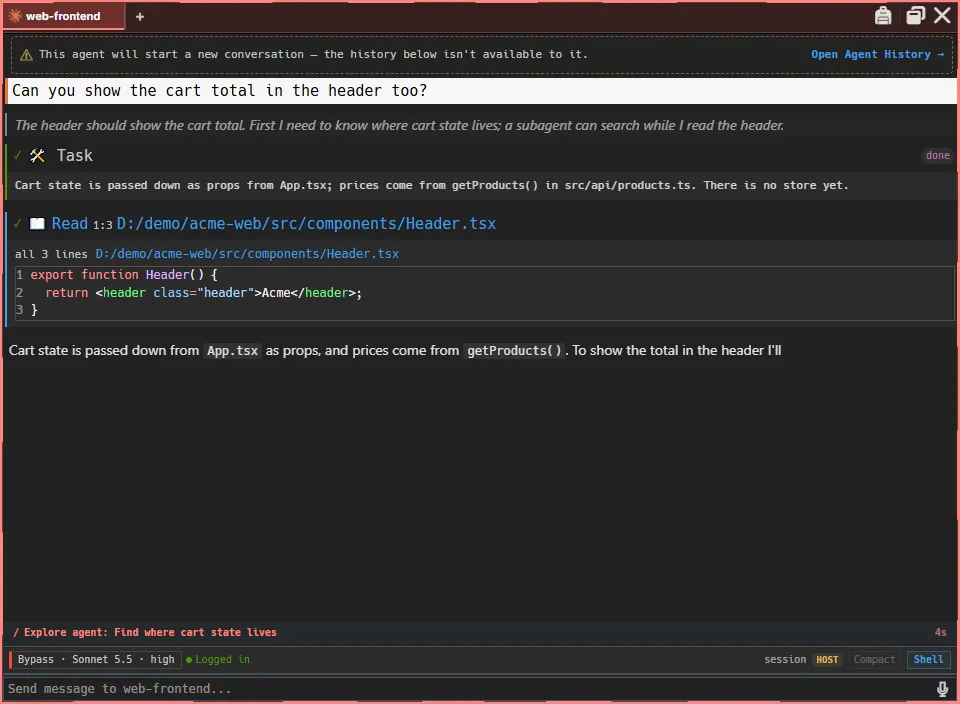
To give the agent files (screenshots, PDFs, Office documents, code), drop them anywhere on the pane or paste them into the message box; they’re attached to your next message. See Attaching files.
The pane header shows the agent as a tab, with its name and its provider’s logo. Double-click the tab to rename the agent. Closing the last agent tab in a pane returns the pane to My Agents instead of closing it.
Ending an agent
Section titled “Ending an agent”Type /quit (or /exit) in the message box to end the agent gracefully. AgentMux releases the agent’s work claims, stops the shells it started and closes its tab. The conversation is kept: pick the agent in My Agents to resume it.
Closing an agent pane, with its close button or a shortcut, ends its agents the same way. The pane stays on screen with a “Shutting down…” log of what it stops (the turn, the agent and each process), then closes. If something can’t be stopped, the pane stays open with Try again and Keep open (frontend/app/view/agent/shutdown/). Terminal, editor and browser panes close at once.
An agent can also end itself, through AgentMux’s QuitSelf tool. It’s meant for when you ask it to quit. If your own message started the current turn and the agent quotes it, the agent shuts down without delay. Otherwise the pane shows a banner saying who asked to shut the agent down, and why, with a countdown (“Closing in 15 s”) and a Keep running button. A chime plays when the banner appears and again with 5 seconds left. The same 15-second window applies when another agent closes this agent’s pane or stops it with ClosePane or FleetBulkStop, and when an agent calls ClosePane with no arguments to close its own tab. Click Keep running to cancel the shutdown (crates/srv/src/sagas/pending_shutdown.rs).
Running a shell command
Section titled “Running a shell command”Start a message with ! to run it as a shell command in the agent’s working directory instead of sending it to the model:
!git status!ls -la dist/The pane’s Shell drawer opens below the message box, and the command’s output appears there when it finishes. The Shell button in the status strip above the message box also shows and hides the drawer. Commands time out after 5 minutes. They run with sh -c; on Windows that is Git for Windows’ sh, which AgentMux finds even when Git Bash isn’t on your PATH (set AGENTMUX_BASH to the path of a bash or sh to use a different one). A message with files attached is sent to the agent, not run (crates/srv/src/backend/posix_shell.rs).
When the agent asks you a question
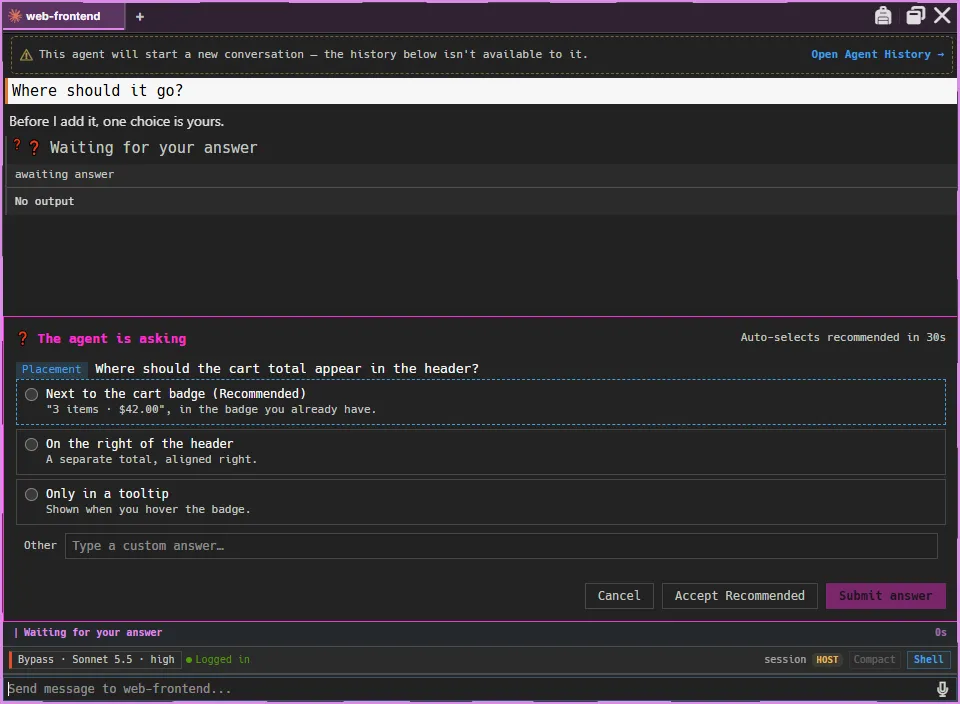
Section titled “When the agent asks you a question”Some agents can stop and ask you a question. The panel (“The agent is asking”) appears above the message box, with Cancel, Accept Recommended and Submit answer. If you don’t answer, it picks the recommended answers after 30 seconds (the agent:askquestiontimeoutms setting). Hovering over the panel or pressing a key in it pauses the countdown for 15 seconds, after which it starts again from the full timeout. For Claude Code, if the agent produces no output within 4 seconds of your answer, AgentMux re-sends the answer as a follow-up message.
When an agent fails
Section titled “When an agent fails”AgentMux classifies each failure (crates/srv/src/agents/failure.rs) and shows a row with the actions that fit it (frontend/app/view/agent/failure/failure-accessory.ts):
| Failure | Actions |
|---|---|
| Not signed in, no account linked, or credentials rejected | Log in (Login Again after a turn has run), Login via terminal, Connectors → Accounts or Bind |
| Rate limited, API overloaded, network error | Retries automatically after about 5, 15, 30, 60 and then 120 seconds, then waits for you. Retry now at any time. |
| Usage limit reached | Accounts (switch / upgrade), which opens Connectors → Accounts. Retrying won’t help until the limit resets. |
| Context window exceeded | New session |
| Hit the turn limit | Continue |
| CLI couldn’t start | Provider setup |
| Process killed, no output, or other error | Retry |
| Agent was deleted | No retry |
| Running in another AgentMux instance | Take over, then Confirm take over. This stops the agent in the other instance and runs it here. |
Rows with an explanation or captured CLI output also have Details, and every row has a dismiss button.
Host and container agents
Section titled “Host and container agents”Host agents run the CLI directly on your machine, with access to your files, environment and credentials.
Container agents run each turn inside a Docker container that only sees the agent’s workspace. Only Claude Code has a container image today (ghcr.io/agentmuxai/agent-claude:latest); every other harness is host-only. The container option needs Docker installed and its daemon running. If it’s greyed out as “Docker not detected”, start Docker Desktop; the panel notices within a few seconds.
The Claude template suggests the container runtime, so when Docker is running, its new-agent panel preselects it. Choose On this computer (host) if you want a host agent.
Skills
Section titled “Skills”Skills are reusable instructions an agent can call. Manage them app-wide in Memory → Skills (+ New skill), or for one agent from the Stash button in its pane header, on the Skills tab. There are two kinds:
| Kind | Description |
|---|---|
| Slash command (/trigger) | A prompt the agent runs when you type its trigger |
| Agent Skill (SKILL.md) | A skill in the SKILL.md format (beta) |
Memory → Skills lists the app-wide skills, including the ones AgentMux comes with:
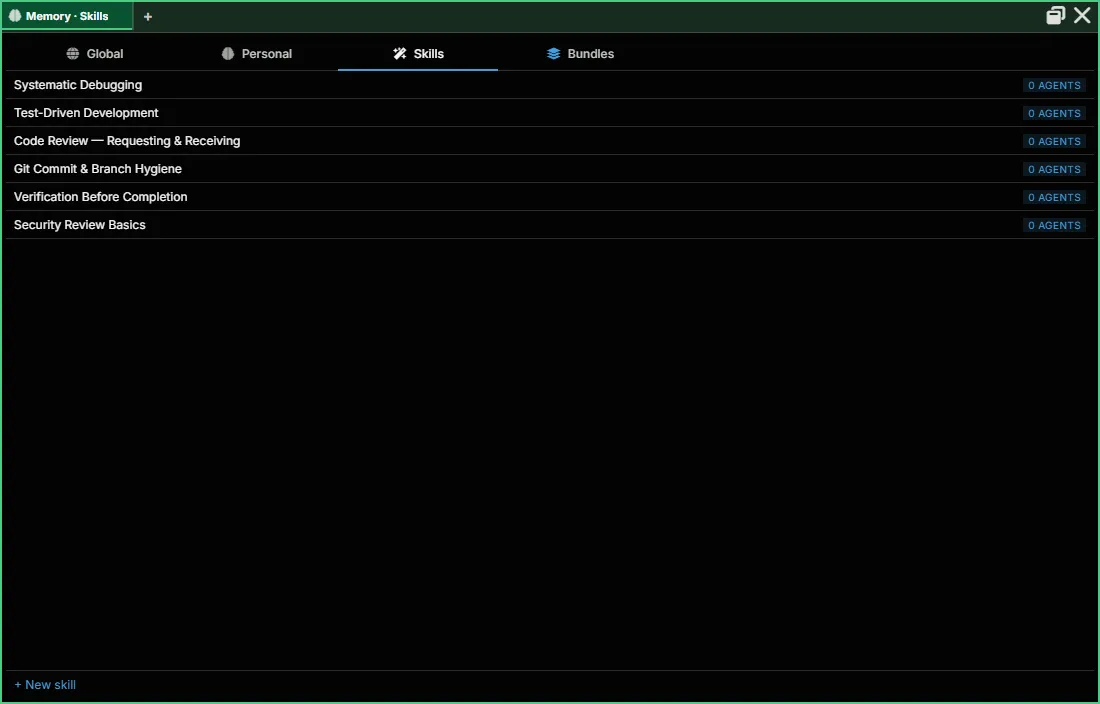
AgentMux writes skills into the agent’s working directory as Claude Code slash commands (.claude/commands/) and skills (.claude/skills/), so they take effect for Claude Code agents (crates/srv/src/backend/agent_config.rs, build_config_files).
Next Steps
Section titled “Next Steps”- Auth flows: sign-in and credential storage per provider
- Bundles: the full bundle reference
- Pane Types: all pane types, including agent panes
- Configuration: global and per-agent settings